Applies to:
Block at first sight is a feature of next gen protection that provides a way to detect and block new malware within seconds.
It is enabled by default when certain pre-requisite settings are also enabled. In most cases, these pre-requisite settings are also enabled by default, so the feature is running without any intervention.
You can specify how long the file should be prevented from running while the cloud-based protection service analyzes the file.
You can also customize the message displayed on users' desktops when a file is blocked. You can change the company name, contact information, and message URL.
Tip
You can also visit the Microsoft Defender ATP demo website at demo.wd.microsoft.com to confirm the features are working and see how they work.
How it works
When Windows Defender Antivirus encounters a suspicious but undetected file, it queries our cloud protection backend. The cloud backend applies heuristics, machine learning, and automated analysis of the file to determine whether the files are malicious or clean.
Windows Defender Antivirus uses multiple detection and prevention technologies to deliver accurate, real-time, and intelligent protection. Get to know the advanced technologies at the core of Microsoft Defender ATP next generation protection. 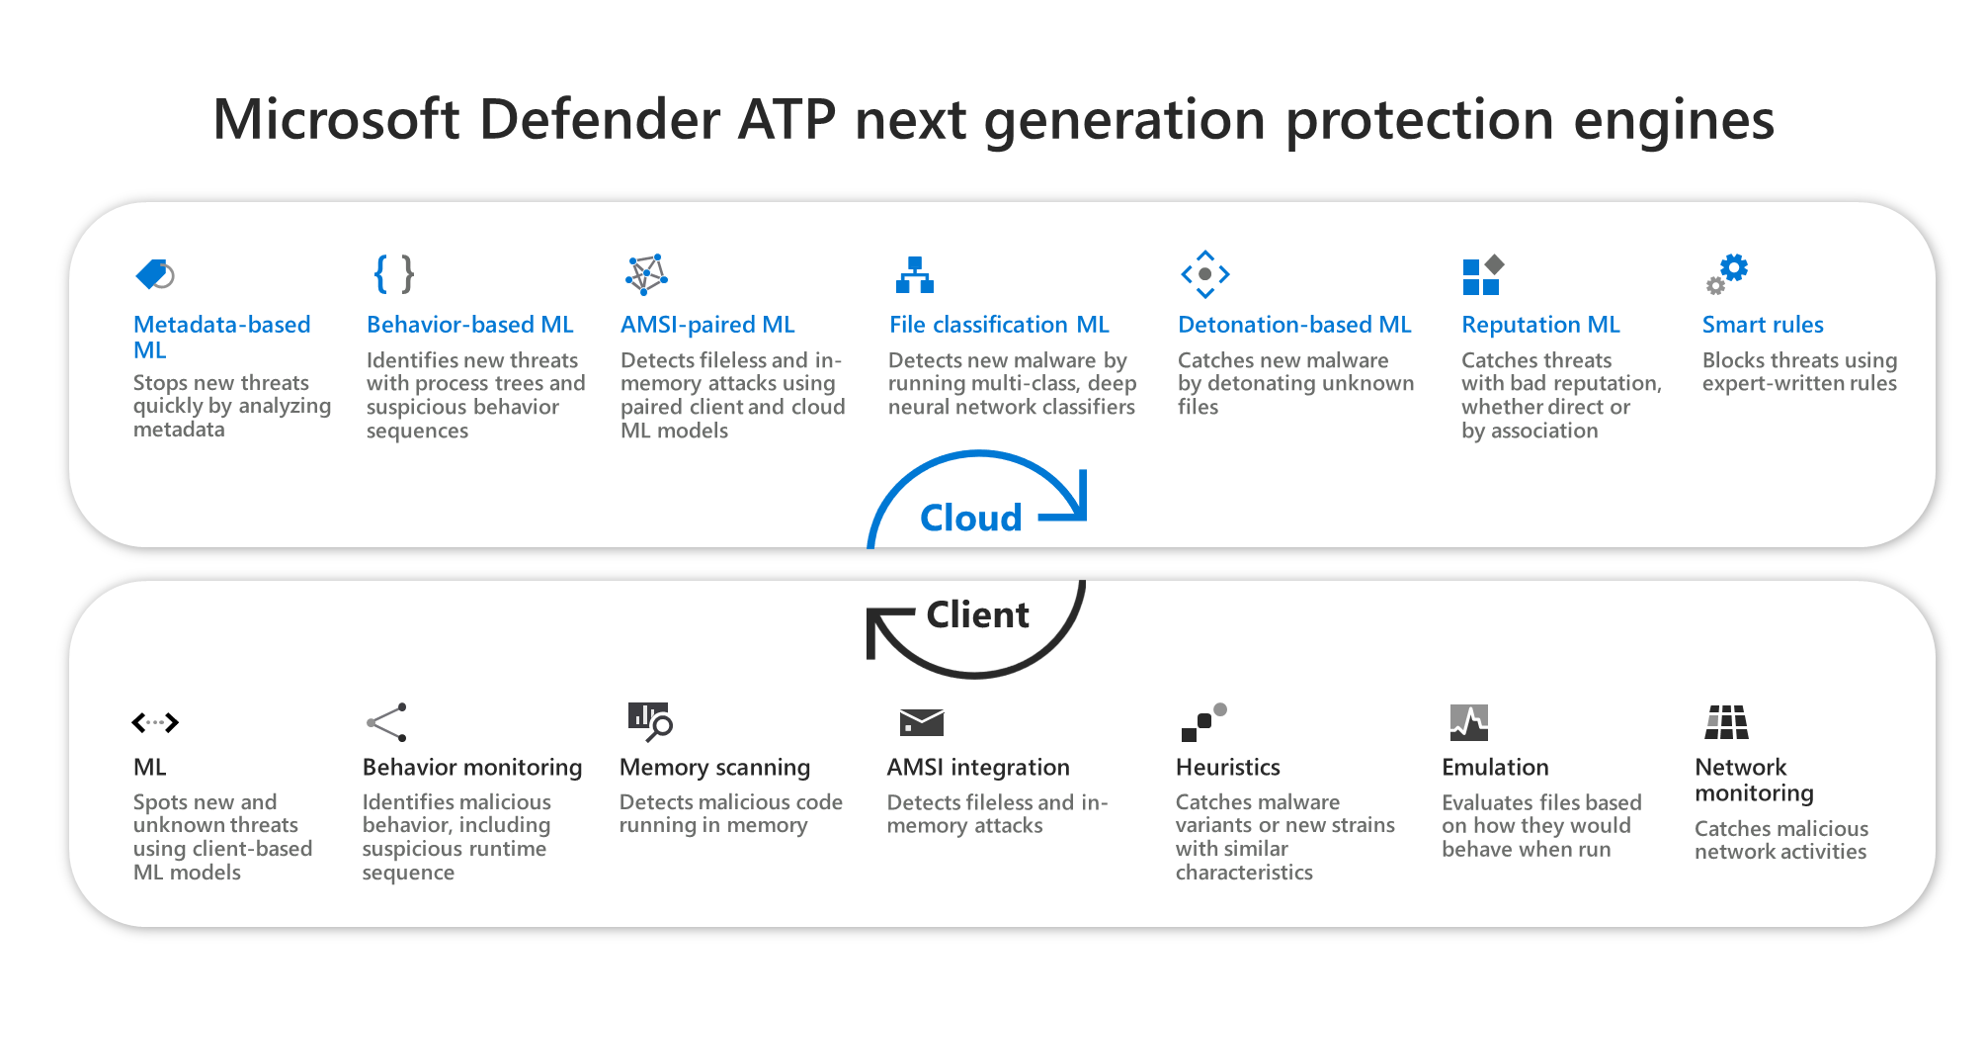
In Windows 10, version 1803, block at first sight can now block non-portable executable files (such as JS, VBS, or macros) as well as executable files.
Block at first sight only uses the cloud protection backend for executable files and non-portable executable files that are downloaded from the Internet, or that originate from the Internet zone. A hash value of the .exe file is checked via the cloud backend to determine if this is a previously undetected file.
If the cloud backend is unable to make a determination, Windows Defender Antivirus locks the file and uploads a copy to the cloud. The cloud performs additional analysis to reach a determination before it either allows the file to run or blocks it in all future encounters, depending on whether it determines the file to be malicious or safe.
In many cases, this process can reduce the response time for new malware from hours to seconds.
Confirm and validate that block at first sight is enabled
Block at first sight requires a number of settings to be configured correctly or it will not work. These settings are enabled by default in most enterprise Windows Defender Antivirus deployments.
Confirm block at first sight is enabled with Intune
- In Intune, navigate to Device configuration - Profiles > Profile name > Device restrictions > Windows Defender Antivirus.
Note
The profile you select must be a Device Restriction profile type, not an Endpoint Protection profile type.
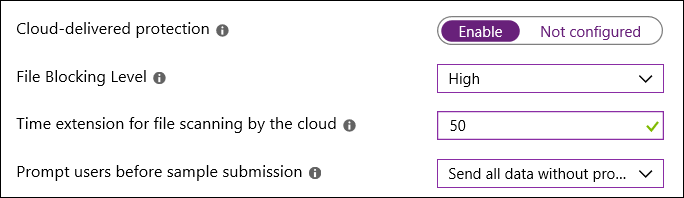
Verify these settings are configured as follows:
- Cloud-delivered protection: Enable
- File Blocking Level: High
- Time extension for file scanning by the cloud: 50
- Prompt users before sample submission: Send all data without prompting
Warning
Setting the file blocking level to High will apply a strong level of detection. In the unlikely event that it causes a false positive detection of legitimate files, use the option to restore the quarantined files.
For more information about configuring Windows Defender Antivirus device restrictions in Intune, see Configure device restriction settings in Microsoft Intune.
For a list of Windows Defender Antivirus device restrictions in Intune, see Device restriction for Windows 10 (and newer) settings in Intune.
Enable block at first sight with SCCM
- In System Center Configuration Manager, click Assets and Compliance > Endpoint Protection > AntiMalware Policies.
- Click Home > Create Antimalware Policy.
- Enter a name and a description, and add these settings:
- Real time protection
- Advanced
- Cloud Protection Service
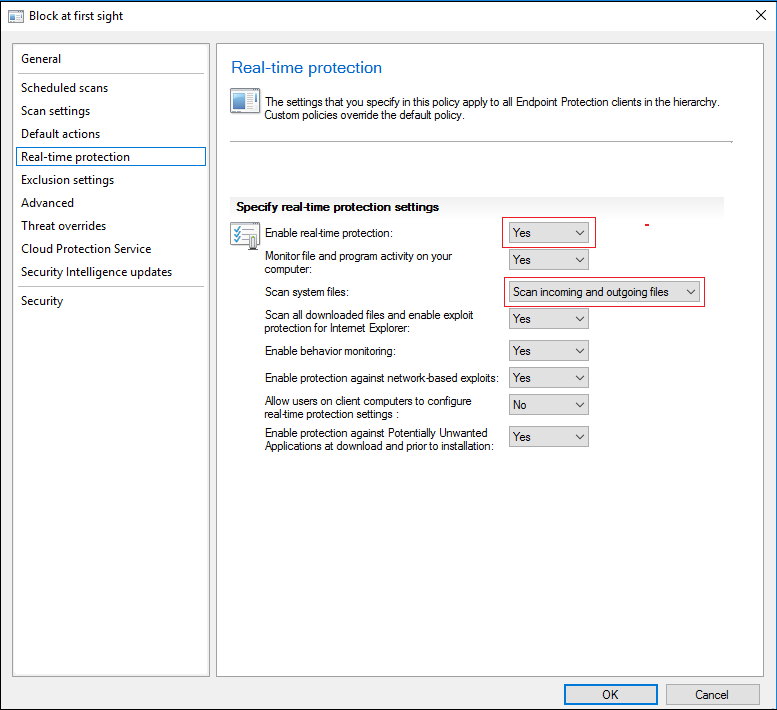
- In the left column, click Real time protection, set Enable real-time protection to Yes, and set Scan system files to Scan incoming and outgoing files.
5. Click Advanced, set Enable real-time protection to Yes, and set Scan system files to Scan incoming and outgoing files.
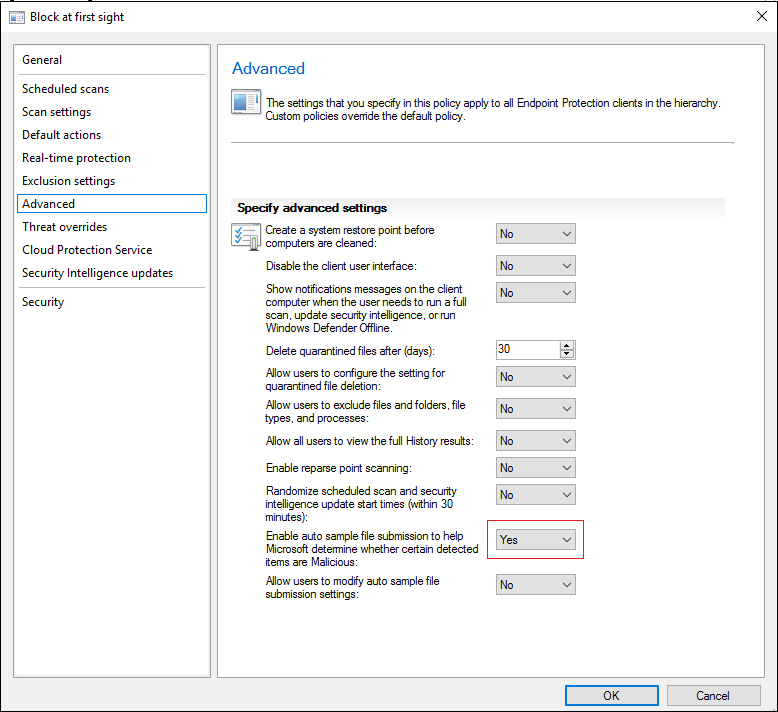
6. Click Cloud Protection Service, set Cloud Protection Service membership type to Advanced membership, set Level for blocking malicious files to High, and set Allow extended cloud check to block and scan suspicious files for up to (seconds) to 50 seconds.
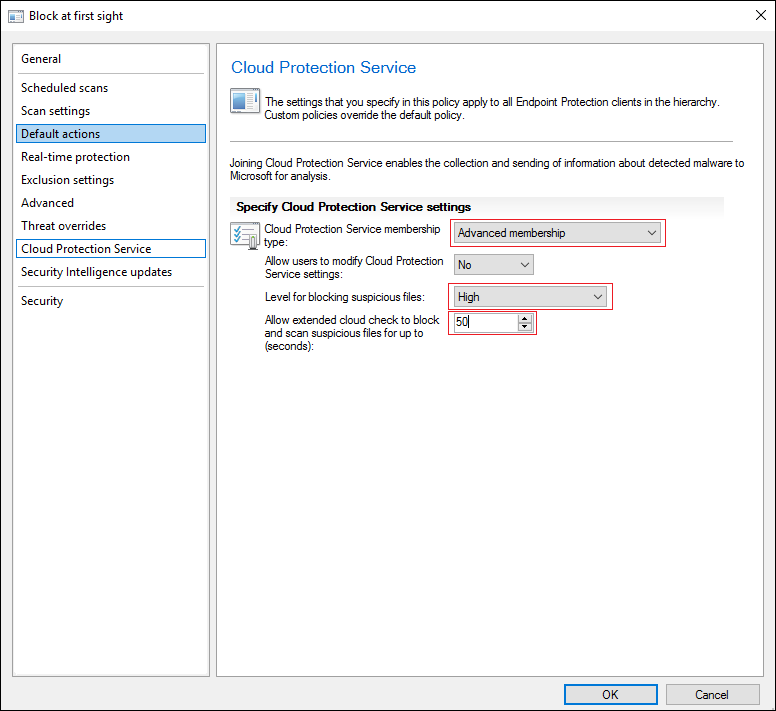
7. Click OK to create the policy.
- On your Group Policy management computer, open the Group Policy Management Console, right-click the Group Policy Object you want to configure and click Edit.
- In the Group Policy Management Editor go to Computer configuration and click Administrative templates.
- Expand the tree to Windows components > Windows Defender Antivirus > MAPS and configure the following Group Policies:
- Double-click Join Microsoft MAPS and ensure the option is set to Enabled. Click OK.
- Double-click Send file samples when further analysis is required and ensure the option is set to Enabled and the additional options are either of the following:
- Send safe samples (1)
- Send all samples (3)
Warning
Setting to 0 (Always Prompt) will lower the protection state of the device. Setting to 2 (Never send) means block at first sight will not function.
c. Click OK.
- In the Group Policy Management Editor, expand the tree to Windows components > Windows Defender Antivirus > Real-time Protection:
- Double-click Scan all downloaded files and attachments and ensure the option is set to Enabled. Click OK.
- Double-click Turn off real-time protection and ensure the option is set to Disabled. Click OK.
- If you had to change any of the settings, you should re-deploy the Group Policy Object across your network to ensure all endpoints are covered.
You can confirm that block at first sight is enabled in Windows Settings.
Block at first sight is automatically enabled as long as Cloud-based protection and Automatic sample submission are both turned on.
Confirm Block at First Sight is enabled on individual clients
- Open the Windows Security app by clicking the shield icon in the task bar.
- Click the Virus & threat protection tile (or the shield icon on the left menu bar) and then click Manage Settings under Virus & threat protection settings:
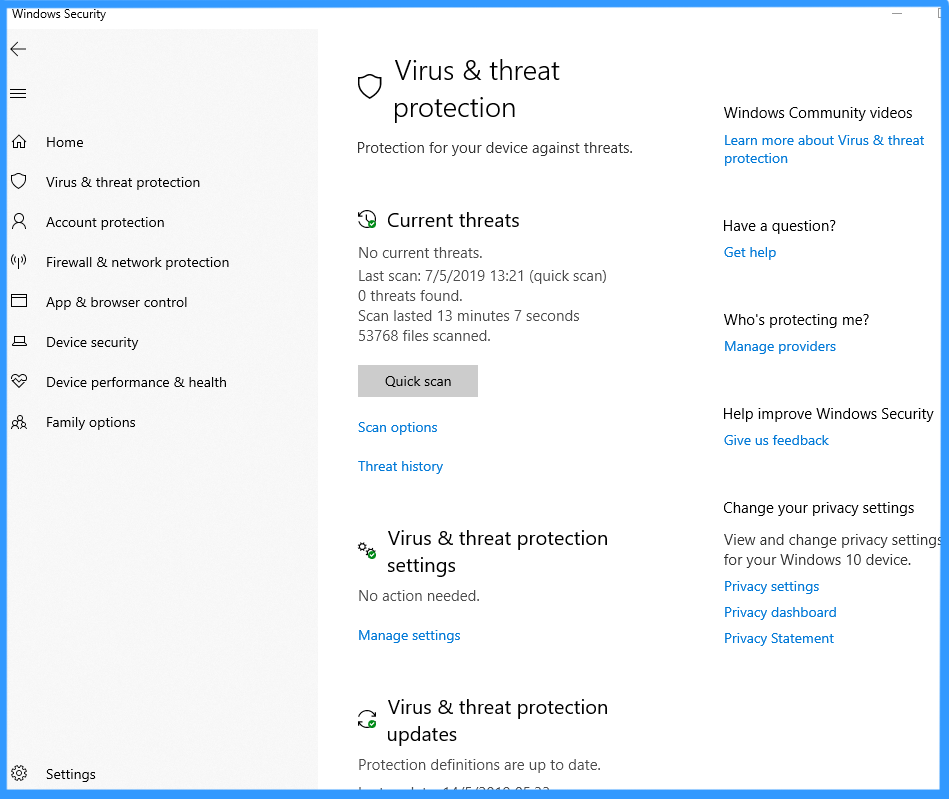
- Confirm that Cloud-based Protection and Automatic sample submission are switched to On.
Note
If the pre-requisite settings are configured and deployed using Group Policy, the settings described in this section will be greyed-out and unavailable for use on individual endpoints. Changes made through a Group Policy Object must first be deployed to individual endpoints before the setting will be updated in Windows Settings.
Validate block at first sight is working
You can validate that the feature is working by following the steps outlined in Validate connections between your network and the cloud.
Disable block at first sight
Warning
Disabling block at first sight will lower the protection state of the endpoint and your network.
You may choose to disable block at first sight if you want to retain the pre-requisite settings without using block at first sight protection. You might wish to do this if you are experiencing latency issues or you want to test the feature's impact on your network.
Disable block at first sight with Group Policy
- On your Group Policy management computer, open the Group Policy Management Console, right-click the Group Policy Object you want to configure and click Edit.
- In the Group Policy Management Editor go to Computer configuration and click Administrative templates.
- Expand the tree through Windows components > Windows Defender Antivirus > MAPS.
- Double-click Configure the 'Block at First Sight' feature and set the option to Disabled.Note
Disabling block at first sight will not disable or alter the pre-requisite group policies.
I gotta favorite this site kms activator for windows 10 seems handy very helpful
ReplyDeleteConfigure Block At First Sight Windows Defender Antivirus _Enable Block Windows 10 >>>>> Download Now
Delete>>>>> Download Full
Configure Block At First Sight Windows Defender Antivirus _Enable Block Windows 10 >>>>> Download LINK
>>>>> Download Now
Configure Block At First Sight Windows Defender Antivirus _Enable Block Windows 10 >>>>> Download Full
>>>>> Download LINK BS
I really appreciate your support on this.
ReplyDeleteLook forward to hearing from you soon.
I’m happy to answer your questions, if you have any.
เล่นบาคาร่า
เครดิตฟรี
เล่นบาคาร่า
เล่นบาคาร่า
Configure Block At First Sight Windows Defender Antivirus _Enable Block Windows 10 >>>>> Download Now
ReplyDelete>>>>> Download Full
Configure Block At First Sight Windows Defender Antivirus _Enable Block Windows 10 >>>>> Download LINK
>>>>> Download Now
Configure Block At First Sight Windows Defender Antivirus _Enable Block Windows 10 >>>>> Download Full
>>>>> Download LINK fQ